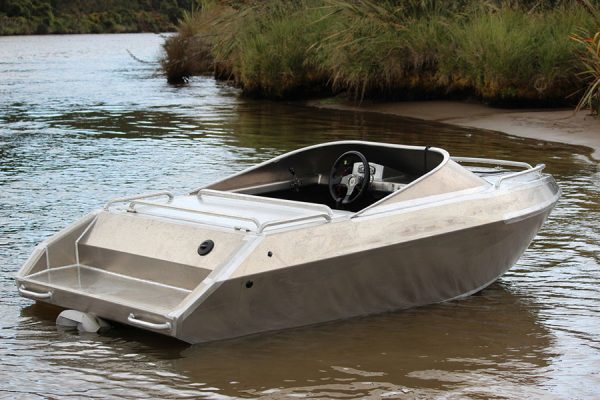
Building a Lightweight Mini Jet Boat with Simple Plans
The allure of a jet boat lies in its ability to navigate shallow waters, maneuver with precision, and provide exhilarating thrills. Building your own mini jet boat from scratch can be a rewarding and fulfilling project, allowing you to tailor the design to your specific needs and preferences. While the process may seem daunting, this article outlines a comprehensive guide to constructing a lightweight mini jet boat using simple plans, making it accessible to DIY enthusiasts of all skill levels.
Choosing the Right Design and Materials
Before embarking on the construction process, careful consideration must be given to the design and materials that will best suit your project. The mini jet boat should be lightweight and maneuverable, allowing for easy transport and agile performance. Here are some key factors to consider:
Hull Design
- Planing Hull: This design features a flat bottom with a sharp bow, enabling the boat to plane (lift out of the water) at high speeds. It offers excellent maneuverability and speed but may be less stable at low speeds.
- Displacement Hull: This design has a rounded bottom and a gradual bow, allowing the boat to displace water and maintain stability at all speeds. It is less maneuverable than a planing hull but provides a smoother ride in rough waters.
- Catamaran Hull: This design consists of two parallel hulls, offering increased stability and buoyancy. It is generally heavier than single-hull designs but provides a more stable platform.
Material Selection
- Fiberglass: Lightweight, strong, and durable, fiberglass is a popular choice for boat hulls. It offers excellent water resistance and can be molded into complex shapes. It requires specialized tools and knowledge for proper application.
- Aluminum: Lightweight and corrosion-resistant, aluminum is another suitable option for mini jet boat construction. It is relatively easy to work with but may require additional reinforcement for structural integrity.
- Plywood: This affordable and readily available material can be used for the hull and other components. It is relatively easy to work with but may require additional waterproofing measures.
Step-by-Step Construction Guide
Once you have chosen the design and materials, it's time to begin construction. Here's a detailed step-by-step guide to building your mini jet boat:
1. Design and Planning
Start by sketching out the boat's dimensions and overall design on paper. This will help you visualize the final product and determine the required materials. Consider factors such as:
- Length and Width: Determine the optimal size for your intended use and transport capabilities.
- Draft: The boat's draft (the distance between the waterline and the bottom of the hull) will influence its ability to navigate shallow waters.
- Freeboard: The height of the boat's sides above the waterline will determine its stability and resistance to waves.
- Power: Choose an appropriate engine size and type to achieve the desired performance.
2. Hull Construction
The hull is the most crucial component of the boat, providing structural integrity and buoyancy. Here's a breakdown of the construction process for different materials:
Fiberglass Hull
- Mold Construction: Create a mold using plywood or foam to shape the hull. The mold should be accurate and smooth to ensure a clean finish on the fiberglass hull.
- Fiberglass Layup: Apply layers of fiberglass cloth and resin to the mold, following a specific layup schedule to achieve the desired thickness and strength. Allow each layer to cure completely before applying the next.
- Finishing: Once the hull is fully cured, remove it from the mold and sand it smooth. Apply a primer and paint to provide a protective coating.
Aluminum Hull
- Cutting and Shaping: Cut and shape aluminum sheets according to the design plans. Use a metal brake to bend and form the hull sections.
- Welding: Weld the aluminum sections together, ensuring proper alignment and strength. Reinforce critical areas with additional welding or brackets.
- Finishing: After welding, sand and polish the hull to remove any imperfections. Apply a protective coating to prevent corrosion.
Plywood Hull
- Framing: Construct a frame using plywood strips or beams to support the hull shape. Use marine-grade plywood and waterproof glue for durability.
- Planking: Cover the frame with plywood planks, ensuring a tight fit and proper alignment. Use waterproof glue and fasteners to secure the planks to the frame.
- Finishing: Apply a layer of epoxy resin and fiberglass cloth to the hull for waterproofing. Sand and paint the hull for protection and aesthetics.
3. Deck Construction
The deck provides a platform for the driver, passengers, and equipment. Construction steps are similar to the hull, depending on the chosen material:
- Framing: Construct a frame for the deck using wood or aluminum, depending on the chosen material.
- Planking: Cover the frame with plywood or aluminum sheets, ensuring a secure fit and proper drainage.
- Finishing: Sand and paint the deck for a smooth finish and added protection.
4. Jet Drive Installation
A jet drive system is essential for propelling the mini jet boat. You can purchase a pre-built jet drive unit or assemble one yourself. Here are the key components:
- Pump: The pump draws water from the intake and propels it out the nozzle, creating thrust.
- Impeller: The impeller is a rotating blade that pushes water through the pump.
- Nozzle: The nozzle directs the water flow to create thrust and steer the boat.
- Intake: The intake draws water from the bottom of the hull, providing the pump with a constant supply.
5. Engine Installation
Select a suitable engine for your mini jet boat, taking into account factors like power output, weight, and fuel consumption. Mount the engine securely to the boat's transom using a robust engine bracket. Connect the engine to the jet drive unit via a drive shaft. Ensure proper alignment and lubrication of the drive shaft for optimal performance.
6. Steering and Control Systems
Install a steering system to control the boat's direction. This typically involves a steering wheel, cables, and a steering mechanism connected to the nozzle. Also, install a throttle and control system for adjusting the engine speed and jet drive operation.
7. Electrical Systems
Install a basic electrical system with a battery, fuse box, and wiring to power the engine, navigation lights, and other accessories. Ensure all wiring is properly routed and secured for safety and reliability.
8. Finishing and Testing
Once all components are installed, carefully inspect the boat for any loose connections or potential issues. Conduct a thorough water test in a controlled environment to ensure proper operation and safety. Make adjustments as needed and refine the boat's performance over time.
Safety and Considerations
Safety is paramount when working with power tools, machinery, and water. Always wear appropriate personal protective equipment (PPE) including eye protection, gloves, and a respirator when working with hazardous materials. Additionally, consider the following safety precautions:
- Follow manufacturer's instructions: Always consult the instructions provided by the manufacturer of any tools, equipment, or materials used in the construction process.
- Ensure stability: Carefully assess the boat's stability before launching it into the water, especially in rough conditions. Install safety devices such as life jackets and flares.
- Maintain proper operation: Regularly check the boat's engine, jet drive system, steering, and electrical systems to ensure safe operation.
- Be aware of surroundings: Exercise caution when operating the boat, especially in crowded areas or near obstacles. Be aware of weather conditions and potential hazards.
Conclusion
Building a lightweight mini jet boat with simple plans requires careful planning, craftsmanship, and attention to detail. By following the steps outlined in this guide, DIY enthusiasts can embark on a rewarding project that allows them to customize a boat to their specific needs and preferences. Remember to prioritize safety and ensure proper operation throughout the construction and testing process. With dedication and perseverance, you can create a mini jet boat that provides endless hours of enjoyment and excitement on the water.
0 comments:
Post a Comment