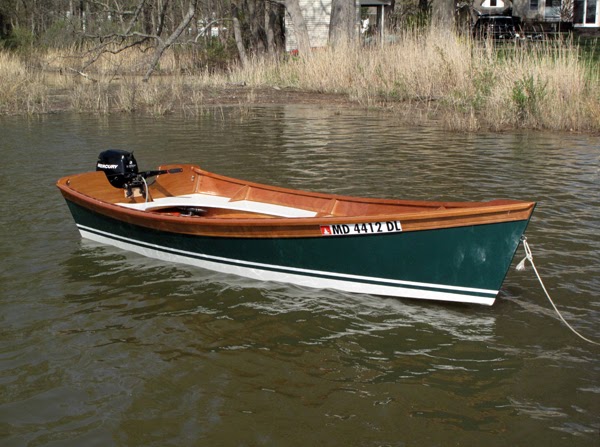
Building a Wooden Skiff: A Step-by-Step Guide
So, you want to build a wooden skiff? That’s awesome! It’s a classic, timeless design that’s perfect for fishing, exploring, or just enjoying a day on the water. Building your own skiff is a rewarding experience, and you’ll get a unique boat that’s built to your specifications. Plus, you’ll learn a ton about woodworking and boatbuilding along the way.
This guide will walk you through the process step-by-step, from selecting materials to launching your finished skiff. Whether you’re a seasoned woodworker or a complete beginner, we’ll make sure you’ve got the knowledge and confidence to build your dream boat.
Choosing Your Skiff Design
The first step is deciding what kind of skiff you want to build. There are a ton of different designs out there, ranging from small, simple dinghies to larger, more complex fishing boats. Here are a few popular options:
- Dory Skiff: Classic, wide-beamed design, very stable and forgiving. Perfect for beginners or those who want a simple, versatile skiff.
- Sharpie Skiff: A more modern design with a distinctive flat bottom and sharp bow. They’re known for their speed and efficiency.
- Punt Skiff: Similar to a dory, but with a wider, flatter bottom and more rounded bow. Great for shallow water and fishing.
- Rowing Skiff: Designed specifically for rowing, with a longer, narrower hull for efficient paddling.
Think about how you plan to use your skiff and what size and features you need. Consider the length, width, draft, and weight capacity. You can find free plans online for many skiff designs, or purchase plans from reputable boatbuilding companies.
Gather Your Tools and Materials
Once you’ve chosen a design, you’ll need to gather the necessary tools and materials. Here’s a basic list:
Tools
- Hand tools: Saw, chisel, plane, hammer, screwdriver, drill, sandpaper, measuring tape, etc.
- Power tools: Circular saw, jigsaw, router, belt sander, drill press (optional)
- Boatbuilding tools: Boat clamps, caulking tools, epoxy mixing cups, etc.
- Safety gear: Eye protection, ear protection, dust mask, gloves
Materials
- Lumber: Select a marine-grade plywood or solid wood like cedar, oak, or mahogany. Consider the thickness and quality of the lumber based on your design.
- Epoxy resin and hardener: For bonding wood and sealing joints.
- Fiberglass cloth: For strengthening the hull and adding a smooth finish.
- Boat paint: Choose a marine-grade paint that’s resistant to water and UV rays.
- Hardware: Oars, oarlocks, seats, cleats, etc.
Building the Skiff: A Step-by-Step Guide
Now, it's time to start building! Follow these steps to construct your wooden skiff:
Step 1: Cut and Shape the Frames
Start by cutting and shaping the frames (also known as ribs) of your skiff. These are the curved pieces of wood that form the shape of the hull. The frames will be connected to the keel and stem to give your skiff its structure.
Using your boat plans, carefully mark and cut the frames using a saw or a jigsaw. A bandsaw is an excellent tool for this step, as it allows you to cut smooth, precise curves.
Step 2: Build the Keel and Stem
Next, construct the keel and stem. The keel is the backbone of your skiff, running along the center of the bottom, while the stem forms the bow.
Carefully join the keel and stem pieces using epoxy and screws. Make sure your joint is strong and secure. You may need to use boat clamps to hold the pieces in place while the epoxy dries.
Step 3: Attach the Frames to the Keel and Stem
Once the keel and stem are ready, attach the frames to them. The frame placement is crucial for the skiff’s shape. Make sure you follow your plans closely. Use epoxy and screws to join the frames to the keel and stem. You’ll need to use boat clamps to hold the frames in place while the epoxy dries.
Step 4: Planking the Hull
Now it’s time to plank the hull. Planking refers to attaching wooden planks to the frames to form the outer shell of your skiff. This is a crucial step, as it defines the skiff’s shape and strength.
Start by cutting your planks to size, making sure they have slightly overlapping ends. Then, using epoxy and screws, attach the planks to the frames, starting at the keel and working your way up the sides. Make sure each plank is tightly fitted and smooth. You’ll need to use boat clamps to hold the planks in place while the epoxy dries.
Step 5: Sealing and Finishing the Hull
After planking is complete, it’s time to seal and finish the hull. This involves applying layers of epoxy resin to the hull to protect it from water damage and create a strong, watertight barrier.First, sand the hull to smooth out any rough edges and gaps. Then, apply several layers of epoxy, allowing each layer to dry completely before applying the next. Once the epoxy is cured, you can apply a final layer of epoxy, followed by a coat of fiberglass cloth for extra strength.
Step 6: Building the Deck and Interior
Next, build the deck and interior of your skiff. This involves attaching plywood to the hull and adding features like seats, a motor mount, and storage compartments.
Cut and shape the plywood for the deck and attach it to the hull using epoxy and screws. You’ll need to carefully plan out the layout of the deck and install any necessary hardware, like cleats and handles. Then, build and install the seats and other interior features.
Step 7: Finishing Touches
The final step is to apply a final coat of paint and add any remaining hardware.
Choose a high-quality marine paint that’s designed to withstand the elements. You can also add some decorative touches like stripes or a custom logo. Once the paint is dry, install the oars, oarlocks, and any other remaining hardware.
Launching Your New Skiff
Congratulations! You’ve built your own wooden skiff. It’s time to take it for a test drive. Make sure you choose a calm day with no strong winds. Take your time, and get a feel for your new skiff. Enjoy the fruits of your labor!
Commonly Asked Questions
How much does it cost to build a wooden skiff?
The cost of building a skiff will vary depending on the size, design, and materials you choose. However, you can expect to spend anywhere from a few hundred dollars to a few thousand dollars for materials and tools.
How long does it take to build a wooden skiff?
The time it takes to build a skiff will also depend on the design and your skill level. A simple, small skiff can be built in a few weeks, while a larger, more complex skiff can take months to complete.
Do I need any special skills or experience to build a skiff?
While building a skiff is challenging, it’s not impossible for beginners. If you’re a skilled woodworker, it’ll be easier, but with patience and dedication, anyone can learn to build a wooden skiff. There are tons of resources available online and in libraries that can teach you the basics of boatbuilding.
Is it worth it to build my own skiff?
That’s up to you! Building a wooden skiff can be a very rewarding experience, especially if you enjoy woodworking and boatbuilding. It can be a lot of work, but the feeling of accomplishment and pride in owning a boat you built yourself is priceless.
So, are you ready to take on this exciting challenge? Building a wooden skiff can be an incredibly rewarding journey. With careful planning, patience, and a passion for boatbuilding, you can create a timeless and beautiful boat that you’ll enjoy for years to come. Happy building!
0 comments:
Post a Comment